You can be the hit of the neighborhood with a Haunted
Graveyard party! Yes it’s a little early
to start thinking about Halloween but some of the props for the graveyard take
a while to make. I have one every year,
I decorate my entire front yard as a spooky graveyard called Skull Valley
Graveyard. Then my annual party is at
the Cemetery Caretaker House (my house) at Skull Valley Graveyard. I totally
remade my graveyard this last year with all new props which are more durable.
The fence around the new graveyard is made out of picket fence boards cut into four pieces then I aged them by chopping into them with my circular saw. When they were all cut I painted them a dark brown and screwed them into 4’ fence sections.
The fence posts were framed with 2 x 2 boards with 1/4”
lauan boards screwed on the outside.
lauan boards screwed on the outside.
Once the fence posts were all made I applied thin set (a cement mixture
used for laying tile) on the outside of them to make them look like stone and then painted them with
outdoor gray paint. I screwed life size plastic skulls on the top of them. I used
brackets and zip ties to connect the fence sections to the fence posts. On the two fence posts on each side of the
driveway I hung old candle hanging lanterns.
I made some gravestones out of 2” rigid foam board which can
be purchased at Lowe’s or Home Depot. It
comes in 4’ x 8’ sheets and I cut it into various sizes for different
gravestones. Some were 2’ x 2’, some 2’
x 3’ etc. since in real graveyards all the gravestones are different.
I engraved them with a soldering gun which gets very hot and then it melts and engraves the foam board (do this in a well-ventilated area). The engraved letters were painted with black paint and the rest of the gravestone were painted with different shades of gray and tan to simulate stone.

 Since I didn’t have time to make all homemade gravestones I also bought some at Home Depot and then screwed 1x3 boards on the bottom to weight them down. I painted those boards to match the gravestones (black and gray).
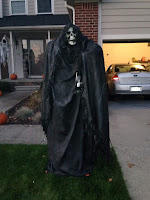
My most popular attraction in the graveyard is my Grim Reaper
who is 6’ tall. I made a new one this year also. To make it you
create a PVC pipe frame then put chicken wire over the PVC pipe frame. After that you use burlap coated with “monster mud”
and hang it on the frame. Monster mud is
drywall compound with black outdoor latex paint mixed in with it. Once the monster mud coated burlap dried I
spray painted it with spray black and gray rubber paint also purchased at Home
Depot. This makes it waterproof and more
durable.
This year my new addition was my skeleton couple sitting on
my front porch with their dogs. They
were purchased from Grandin Road which is an online company. They were a big hit.

Also new this year was a wood life size coffin which I made
and then painted black. It had a lid
which I propped open. I bought a latex
rubber dead man head from one of the Halloween stores which I put in it. I put a red spot light in the base of the
coffin shining up toward the head to make it look spooky.
This is a video of one of the spooky graveyard ghouls we added this year purchased from Grandin Road.
This is a video of one of the spooky graveyard ghouls we added this year purchased from Grandin Road.
The biggest hit for the kids is the candy hunt in
the graveyard. It like an
Easter egg hunt only it’s tiny treat bags with candy and stickers in them. The tiny treat bags I bought at Dollar Tree
which were 40 for $1. I bought many
stickers and tiny toys very cheap off of Oriental Trading Company an internet
company. The treat bags are hidden around the graveyard. I divide the kids into two groups, 5 and under and then older than 5. The 5 and under can have an adult go with the to find the treat bags. We hide the treat bags for the younger group in easy to find spots. The second favorite game the kids like is the Halloween piñata.
This year I added a few new games for the kids. I did musical chairs to the song Ghostbusters
with prizes for the winners. I also did a
Halloween floating duck game where the kids picked up a Halloween decorated duck
until they found one that said “yes” on the bottom. The rubber Halloween ducks were purchased
from Oriental Trading Company I glued small metal washers on the bottom of them
to keep them floating upright. For the
pond I bought a 2’ x 4’ Halloween buffet cooler that inflated which I ordered
from Shindigz another internet company.
The food is all Halloween themed. I serve Ghoulash, deviled eggs with black
spiders made out of black olives on them, barbeque monster eyeballs (meatballs
in bbq sauce), I make a brain jello with watermelon jello using a brain jello
mold I purchased online, Halloween decorated cupcakes and cookies. I also make fruit spears with various pieces of fruit on wood shish kabob sticks which are poked into a carved out pumpkin to look like the hair.
These annual Halloween parties are a huge hit and everyone
looks forward to them every year, especially the kids. What a safe way for kids to have fun at
Halloween!


